UIStackView hides the tediousness and complexity of the Auto Layout. It cuts the number of constraints needed for Auto Layout, and thus makes it effortlesss to hide some of its arragedSubviews or alter their sizes at runtime. This lab unveils UIStackView’s flexibility by building an autosizing UITableViewCell.
1. Overview
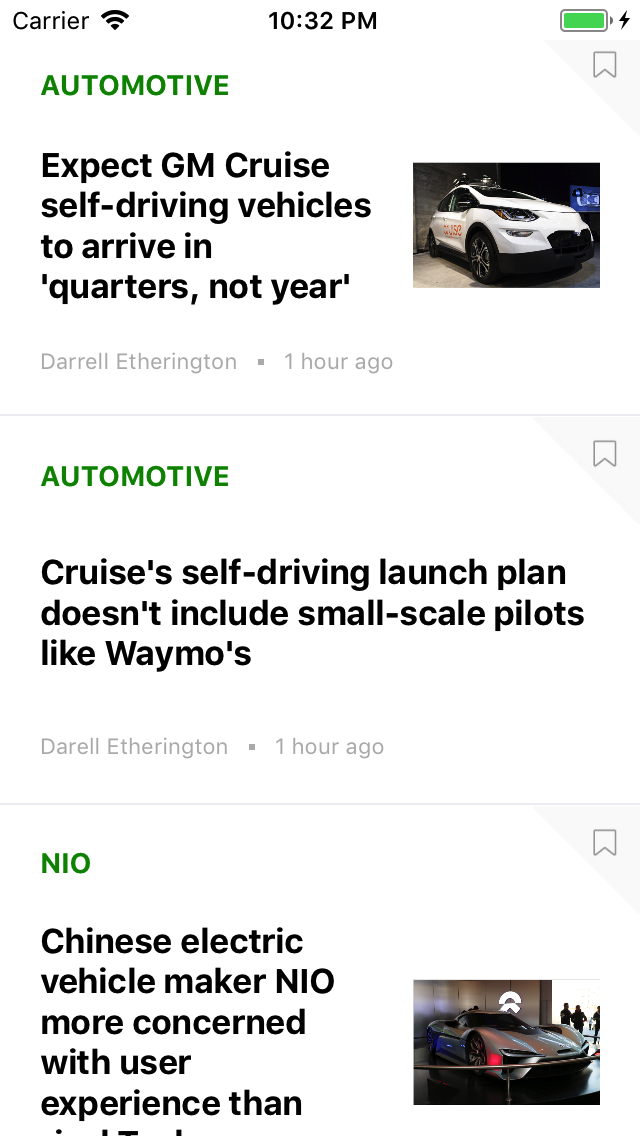
In this lab, we will build a TechCrunch table view to show the catalog of its news. Simple as it looks, the building process manifests how UIStackView can auto sizes the its height when the content size needs to grow, and how UIStackView takes care of the layout when certain arrangedSubviews are hidden.
What you will learn
![]() Automatically sizing the arragedSubviews based on their intrinsicContentSize
Automatically sizing the arragedSubviews based on their intrinsicContentSize
![]() Automatically computing the height of UITableViewCell based on its content
Automatically computing the height of UITableViewCell based on its content
![]() Hiding the arrangedSubviews in UIStackView
Hiding the arrangedSubviews in UIStackView
What you’ll need
- XCode 9.0 and above
- The sample code
- Familiar with Swift language
- Familiar with UITableView datasource
- Familiar with Interface Builder
- Exposed to Protocol Oriented Programming methodology
2. Get the sample code
![]() Clone the repository to your local computer, and switch to the
Clone the repository to your local computer, and switch to the bootcamp branch
git clone git@github.com:ripplearc/AutoSizeTableViewCell.git
git checkout bootcamp
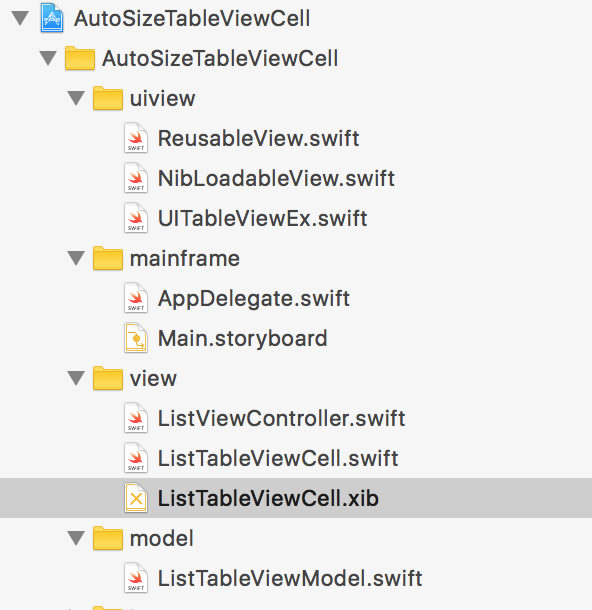
Take a look at the project file structure: we will be mainly working on the view ![]() ;
; model ![]() provides some mock data captured from TechCrunch for display;
provides some mock data captured from TechCrunch for display; uiview ![]() contains protocol extensions to make the code in UITableViewController cleaner.
contains protocol extensions to make the code in UITableViewController cleaner.
Build and run, it should show a blank UITableView.
3. Basics about UIStackView
![]() Apple’s official documentation provides an excellent interpretation of the design philosophy of UIStackView. UIStackView layouts its arrangedSubviews through its properties of
Apple’s official documentation provides an excellent interpretation of the design philosophy of UIStackView. UIStackView layouts its arrangedSubviews through its properties of axis, distribution, alignment, and spacing. Distribution decides how arrangedSubviews are laid out along the axis, and alignment decides how they are laid out perpendicular to the axis. Spacing are the exact or the minimum intervals betwween the subviews.
While there are five enumerations in distribution, fill is the default one and probably the most useful one. It instructs the interface builder to fill up the entire space along the axis with specified spacing. If there is too much space to be filled, then whichever has the lower Hugging Priority will be stretched. On the contrary, if there is too little space to accomodate all the arrangedSubviews, then whichever has the lower Compression Priority will be compressed.
If there is no width or height constraint on a horizontal or vertical UIStackView respectively, then UIStackView decides the total height of itself based on the sum of the IntrinsicContentSize of its arrangedSubviews, such as UILabel, UIButton or UIImageView.
![]()
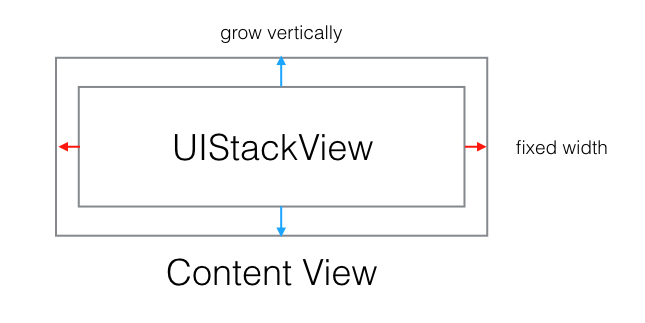
The key to building an autosizing UITableViewCell is to allow the widgets with IntrinsicContentSize, whose content size could change, to decide their own height. To put that in a simple term, don’t set the height constraint on a widget whose height could change at runtime.
In terms of the UITableViewCell, the size of the width is fixed, and we let the UIStackView grows vertically based on the widgets’ IntrinsicContentSize, which frees the developer from calcuating the size of UILabel using sizeThatFits.
We do not have to worry that a UITableViewCell grows out of spaces along the vertical axis, therefore, it is unnecessary to set hugging and compression priority of the arrangedSubviews in a column. However, since the width is fixed, we will see an example where we can leverage hugging and compression.
4. Layout using IntrinsicContentSize
In this section, we will build most of the UITableViewCell except the UIImageView. As you may notice, the majority of the arrangedSubviews are UILabels where we will have IntrinsicContentSize to decide their sizes.
- Drag a
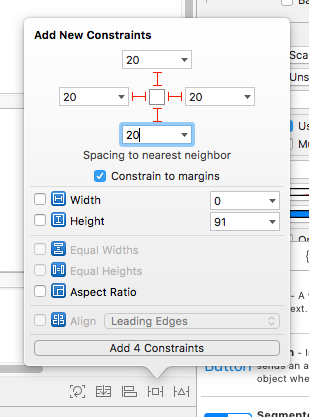
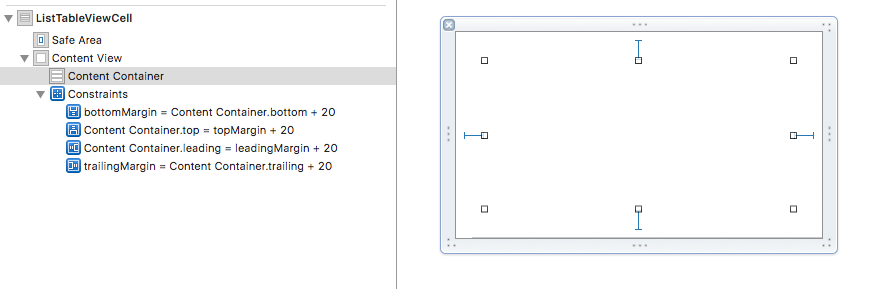
vertical UIStackViewunderneath theContent Viewand name it asContent Containerby pressingReturnon a Mac. AddNew Constraintson all four sides. - Click
Content Container, go toAttributes Inspector, setSpacingto 20.
![]()
It is a good habit to name the components on the interface builder, then the error messages about missing or conflict constraints are more meaningful.
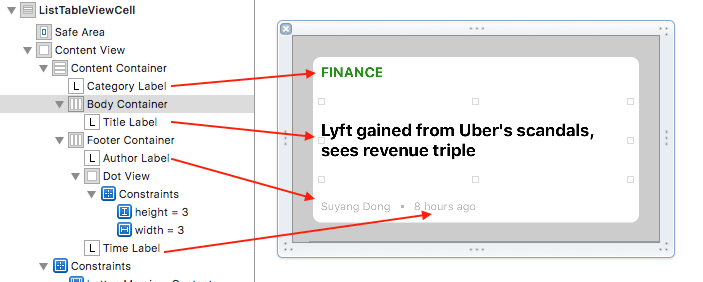
- Drag one
UILabeland twohorizontal UIStackViewunderneath theContent Container, and name themCategory Label,Body ContainerandFooter Containerrespectively. - Drag one
UILabelunderneathBody Containerand name itTitle Label. Set theAlignmenttoCenter. - Drag two
UILabeland oneUIViewunderneathFooter Container, and name themAuthor Label,Time LabelandDot Viewrespectively. Set theAlignmenttoCenter, andSpacingto 20. - Set the height and width constraint of
Dot Viewto 3. - Set the
Hugging PriorityofTime Labelto 249 inSize Inspector, this allows the UIStackView to stretchTime Labelwhen there is extra space as it has lower Hugging Priority thanAuthor LabelandDot View. - Set placeholder texts of
UILabels.
This completes all the interface builder setup ![]() . Connect the widgets from the interface builder to their corresponding
. Connect the widgets from the interface builder to their corresponding IBOutlets, go to ListTableViewCell.swift and populate the widgets with the model.
@IBOutlet weak var categoryLabel: UILabel!
@IBOutlet weak var titleLabel: UILabel!
@IBOutlet weak var timeLabel: UILabel!
@IBOutlet weak var authorLabel: UILabel!

func configure(with model:ListTableViewCellModel) {
    categoryLabel.text = model.category.uppercased()
    titleLabel.text = model.title
    authorLabel.text = model.author
    timeLabel.text = model.timeStamp
}
Go to ListViewController.swift and configure the tableView to auto sizing in the viewDidLoad. estimatedRowHeight is nothing but a guess.
tableView.estimatedRowHeight = 200
tableView.rowHeight = UITableViewAutomaticDimension
tableView.separatorColor = .clear
Run the app in both SE and 8 Plus ![]()

- The UITableViewCell now accommodates
Title Labelwith proper height given any number of lines. -
Author LabelandTime Labelare also sized with proper width whileAuthor LabelpushesTime Labeltowards the right edge when its content grows.
![]() If you have any difficulty in setting things up in the interface builder, commit all the changes and shift to the branch
If you have any difficulty in setting things up in the interface builder, commit all the changes and shift to the branch uilabel
git add --all
git commit -m 'setting up labels'
git checkout uilabel
5 UIImageView
We will place the UIImageView side by side with the Title Label, and let whichever has the greater height to decide the height the UITableViewCell. In addtion, we want bigger image when the screen size increases.
- Drag one
UIImageViewunderneath theBody Container, and name itCover Image. SetSpacingofBody Containerto 20. - Ctrl click
Cover Image, drag it toBody Containerand selectEqual Width. - Select the constraint been created and go to the
Size Inspector, changeMultiplierto1:3. This way the UIImageView will always occupy 1/3 of theBody Container. - Ctrl click
Cover Image, drag to itself and selectAspect Ratio. - Select the constraint and change
Multiplierto3:2. - Change the
Alignmentof theBody ContainertoCenter. This allows the taller widget betweenTitle LabelandCover Imageto decide the height ofBody Container.

![]()
At this point, the interface builder should be free of errors. If you still have one, and you are certain you have followed all the steps, move the cursor to the bottom of the cell, and manually adjust the height of the cell until the error disappears.
Connect the IBOutlet and populate the Cover Image.
...
@IBOutlet weak var coverImage: UIImageView!
...
func configure(with model:ListTableViewCellModel) {
...
if let image = model.imageName {
    coverImage.isHidden = false
    coverImage.image = UIImage(named:image)
} else {
    coverImage.isHidden = true
}
...
}
If you are interested, you can also add a bookmark UIButton on the left upper corner, and a separator line. However those are not the focus of the lab.
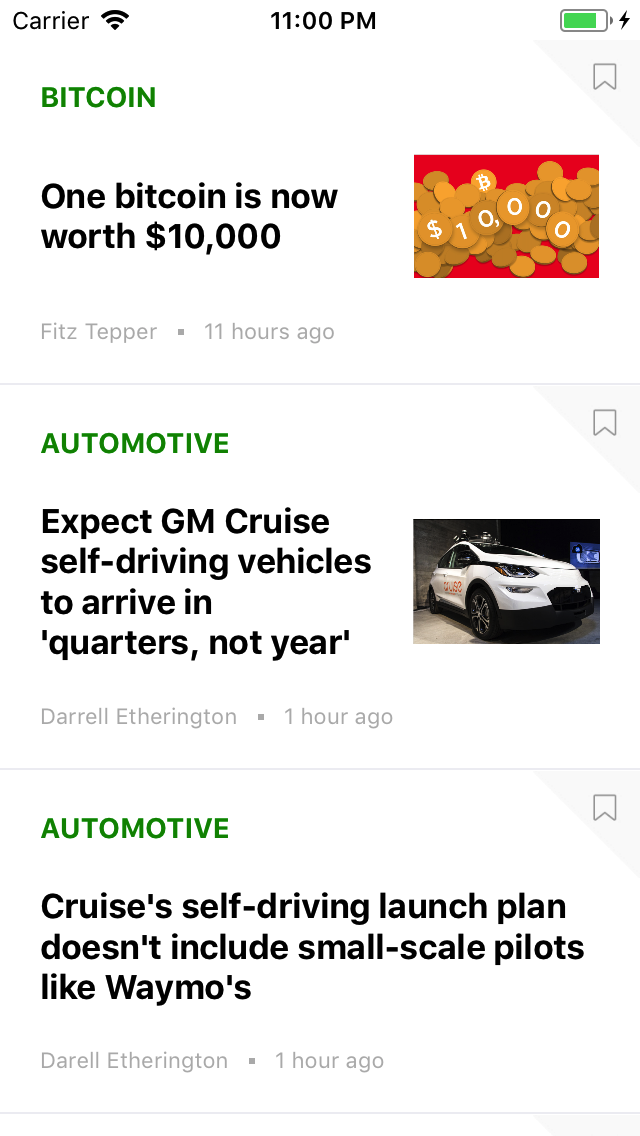
Run the app in both SE and 8 Plus ![]()
![]() You can also shift to the
You can also shift to the master branch.
git add --all
git commit -m `add uiimageview`
git checkout master
The Bitcoin one shows the case where the Cover Image decides the height of the cell, and the Automotive GM one shows that the Title Label can also push the height of the cell. The Title Label in the Automotive Cruise news occupies the entire cell width as the Cover Image is absent. The hiding behavior is taken care of by UIStackView.
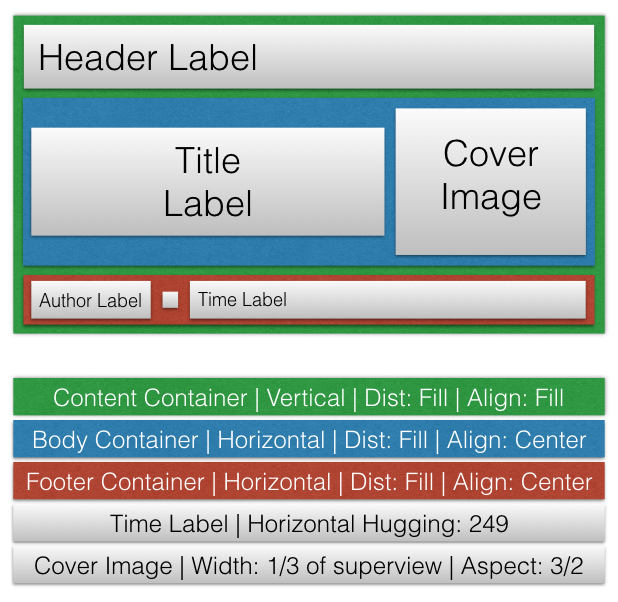
6 Summary
We conclude the lab with an anatomy drawing of the layout, and highlights a few important settings. Other than the Dot View and Cover Image whose height are pre-defined by constant or aspect ratio, the rest of the widgets possess no height constraint and subject to their own IntrinsicContentSize.
What we’ve learned
![]() Use
Use IntrinsicContentSize to decide the height of UILabel
![]() Use
Use Center Alignment to let the tallest widget to decide the height of the UIStackView
![]() Let UIStackView to handle the hiding behavior of the widget
Let UIStackView to handle the hiding behavior of the widget
![]() Automatic sizing of the
Automatic sizing of the UITableViewCell
References
- Apple Developer Documentation UIStackView It explains the a few common ways to pin the UIStackView relative to its superview.
- Self-sizing Table View Cells A very good example to build a gallery app where its UITableViewCell self sizes.
- UIStackView Demystified Illustration about the distribution, alignment, spacing and axis properties of UIStackView.